Sunday, October 26, 2008

Coleus corner

What to do with a dark and shady corner? Last summer I discovered the answer was "sprinkle around some coleus seed" and it produced a beautifully colourful result. And I'm doing it again this year. Just sowed the seed a few weeks back, and the first coleus babies are up this morning.

This is what I enjoyed last summer. One packet of Mr Fothergill's coleus seeds turned into an incredible array of leaf patterns and colours.

Pulling back a few more feet shows the 'corner' in Coleus Corner. It's just outside the door to Pam's studio. Sunshine rarely makes it down here, even in summer, as it's also under the shade of an olive tree. I sowed the seed late-ish last year, and this is how the coleus looked from late December through to late March.
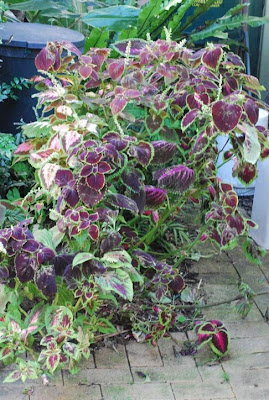
By May the plants had grown taller, stragglier and that tropical carnival of colour had taken on the seedy, dishevelled look of a drunk with a morning-after hangover. Oh well, it is temperate Sydney, not tropical Cairns, and it was good while it lasted.

And so I launched into my completely ill-fated attempt at a cutback in late winter, which merely finished off what was left, rather than prompting a revival. Had my doubts it would work, anyway, I now say with 20:20 hindsight.

So, a few weeks back I invested the huge sum of $2.95 in another packet of coleus seed and here's the most advanced bub. Interestingly, all my coleus babies were this colour at this stage last year. It was much later that they took on their various bright colours.

There is one survivor from last year, Mr Speckled coleus, on the left here. He was the only one not grown from seed – he was given to me by a friend later on once the coleus patch had taken shape. Mr Speckled looks like he's ready to grow on this spring, and with his roots reaching into the compost bin against which he's planted, maybe that's the secret to coleus survival in Sydney winters – lots and lots of compost and other organic matter. I'll try that this year with the newly sown patch and see what happens.

Elsewhere in the land of Coleus Corner there's a small community of shade-lovers who have been doing well for several years, without much attention from me at all. This bird's nest fern is an old hand in my garden, and every year it wins the "most primeval plant" award as it sends up its wonderful new batch of fronds. To the left in this photo is an ornamental ginger which has comprehensively failed to be ornamental so far. Waiting patiently, I am.

You get a peek into planet Earth's distant, ancient beginnings when bird's nest ferns unravel.

Another coleus corner inhabitant is this Pteris fern, whose variegated fingers of leaves brighten the darkness very nicely.

Not sure who this person is, but I bought him at the same time as I bought the Pteris fern about 10 years ago and they have lived together happily ever since.

One of the fascinating little themes that I'm exploring here in my garden is growing as much as possible from seed. For a long time that's been a vegie-growing thing, but with the colourful little success in the shade of Coleus Corner I've reminded myself that everything can be grown from seed.

Sunday, October 19, 2008

Bursting into bloom

Though we have many wonderful months through which we can enjoy the garden here in Sydney, October usually takes top spot for a host of reasons. The growth rate is quite phenomenal when you get that typical October combo of rain then warmth, not to mention the rapidly lengthening daylight hours. Then there's the newness, the freshness of it all. There's just so much in bloom right now that I thought a little lap around the garden is in order.

Grevillea 'Peaches and Cream', a multi-toned new grevillea variety that lots of gardeners are planting. After a slow start, it's doing well now, but the plant is still small, a bit over 1m tall and wide. It should double in size over the next 18 months, I hope.

Also a native plant but much smaller, this is our native violet. Rarely without flowers throughout the year, this little terrier of a groundcover loves moist or cool shade, and when it likes its spot it is almost impossible to eradicate, should you want to grow something else there. Pretty little flowers, though.

Also tiny and rather unusual, these flowers belong to a succulent, which I think is Gasteria.

You'll have to put up with my succulent-identifying skills being ordinary. The plant from which this exquisite, small flower springs looks part echeveria, part graptopetalum to me. I know there are hybrids called graptoverias, so that's my guess. Nice flower, though, whatever it is.

And now for two cheery potted chaps. First up, sweet alyssum, with a sweet scent, too.

And this silver-leaved guy who I call 'buttons' simply because I lost the plant label and don't know its name. I keep a lookout for similar things in nurseries, so I can learn its name. No luck yet.

Down the narrow side passage between our house and our neighbour's, large potted cane begonias thrive in the combination of morning sun and afternoon shade. They're coming into bloom right now.

Also enjoying the side passage conditions in its pot, this is loosely described as New Zealand Christmas Bush (metrosideros) even though it does its blooming here in spring.

While we're talking Christmas bushes, this is our potted NSW Christmas Bush (Ceratopetalum gummiferum), doing its thing now in spring, as it does every year. The real flowers here are small and white, while the pinky-red 'flowers' are colourful bracts (a la bougainvillea and poinsettia, for example). Florists sell stacks of NSW Christmas Bush in December, and a whole tree in red-hued 'bloom' is a wonderful sight.

The pale yellow-green flowers of this pelargonium are the real treasure of this plant every month of the year, but in spring it puts on a presentable pink parade of dainty blooms for several weeks.

Towering over the perlargoniums are the garish orange spikes of our canna lily. I still haven't made my mind up about whether I like this plant's flowers, which start now in October and last all through summer and into autumn. The whole plant is so striking that it probably belongs in a bigger garden. Last autumn I cut the whole clump back by half, to reduce its impact, but when it came to actually getting rid of it altogether I just couldn't.

This is the reason I hang onto the canna – that wonderful striped foliage. This cultivar is called 'Bengal Tiger'.

A far more conventional beauty, this is my friend Evan's wonderfully fragrant standard yellow 'Friesia' rose, which finally got down to the business of blooming just last week.

How could I do a post about flowers without mentioning my poppies, which are still in bloom? Here's a charming orange-yellow mutation that announced itself a few days ago.

And from the poppy patch these wild ones keep on popping up from self-sown seed. This is the most common colour, well ahead of the next most common, a deep, luminous orange that reminds me of Californian poppies.

Last but not least, this morning's latest baby – a thumping big yellow zucchini flower. I love cooking zucchini flowers (stuffed, battered, fried), so this one was harvested immediately and will await the imminent arrival of several siblings which are forming on the other zucchini plants.

As I couldn't imagine having a garden without food plants to use in my cooking, it's similarly unimaginable to have a garden without flowering plants grown for their beauty alone. Yin and yang, I guess.

Saturday, October 18, 2008

Give me curry

If I was allowed only one cookbook in my kitchen I would certainly be inconsolable for awhile, but once I came round to my senses I'd probably hang on to Charmaine Solomon's 'Complete Asian Cookbook'. While my wonderful old mum, who's been cooking up a storm in heaven since 1981, taught me all the Aussie basic recipes that I still love to cook, it was Charmaine, through her book, who taught me how to cook curries. And as soon as we moved into this house 17 years ago, when I finally had space to create a garden, I bought a curry tree (Murraya koenigii), and it's still doing fine in its pot all these years later on.

Here it is this morning, doing its little spring blooming thing. Hardly anything to stop you in your tracks, but to me the piddly little flower show says the magical words of "Hi, I'm happy, healthy and ready to make curries again." Great news!

Standing back a little, here it is in its third pot. Third pot? Yep, this little tree has muscle-bound roots which can crack big, glazed ceramic pots. So every time it wants to upsize its pot it lets me know. As it's native to tropical southern India, it doesn't like cold Sydney winters all that much, and drops leaves and looks scraggly by the end of every winter. A light clip over to remove daggy bits, followed by a feed with chicken poo and some Seasol tonic in spring, and it always bounces back well. Though not especially thirsty it likes a regular drink in summer.

For several years I always thought that you used curry leaves in cooking by dropping a branchlet of eight or so leaves into hot oil right at the beginning of cooking, to flavour the oil. But now I've learned that some Asian cooks chop the fresh leaves and add them to curries right at the end of cooking. Others add the leaves to the blender when blending up the onion, garlic, chillies, ginger etc at the beginning of curry making.

This charming photo of Mr and Mrs Orchard Butterfly making babies was taken by Pam one morning, when she spotted them in flagrante on the way out to her shed. The other thing the photo shows, if you can divert your attention for a moment please, is the curry tree's berries, which start off red then ripen to black. I don't use them in cooking, but last autumn I popped several berries into some potting mix, and every one of them came up, and fairly quickly, too. When berries do this you start to think "oh, no, environmental weed" and indeed this might prove to be the case with my beautiful little curry tree. But then again I've never seen a single native bird feeding on the berries.

The constant companion for my curry tree for almost all its days here has been this Buddha. I found him a pearl shell backrest a while ago, in deference to his age. As the years have gone by the mulch of fallen leaves has slowly grown and yet Buddha remains remarkably pale and serene, as if he's dust-proof.

I'm not a Buddhist, but it is the religion I respect the most, philosophically speaking. So it did occur to me to contact our local ashram just to check whether using Buddha in this way would be offensive to them. I would have removed it if they didn't like the idea. After explaining the basics of where he was, contemplating the curry tree, in a dignified spot elevated well off the ground...
"Does he have a pleasant view of the garden?" I was asked.
"Probably the best, and he gets to see every sunset," I replied.
And that was that. It's agreed all-round – Buddha's got the best seat in the house.


The Hills are Alive!

Some books dare to suggest that potato flowers are 'insignificant', but they don't take into account the significance of the first potato flower for a newbie potato-grower, do they! While my potato patch is belting along this generous Sydney spring, with every plant bristling with flower buds, none has progressed to the next step, well at least until this morning, that is.

Here's the Lone Ranger, daring to be first. Hardly an insignificant flower at all. Quite economical in its prettiness, perhaps even workmanlike as a bloom, but a little burst of pure white with a sunny centre. You'll do me!

Of course the other aspect of growing spuds is this 'hilling' business. I can now see why people grow spuds in cages of straw or stacks of tyres. But in true newbie style I just planted them in what seemed at the time to be deep trenches, following the books to the letter. But as the potatoes grew and the hills piled up around them, the potatoes just grew some more.

All my herb pots have been commandeered to act as 'foothills' to keep the mounds in place. I've been lucky that we haven't had any torrential rains, so the solidity of the hills hasn't been tested. No matter if they get whacked one day. I'll just rebuild them the next morning.

The potato plants themselves are outrageously green and healthy, and you can see that close family resemblance to tomato plants here.

Fortunately, I had just harvested my best-ever and biggest batch of home-made compost around the time I needed to start building my potato hills. It's lovely and sweet and crumbly stuff, and to make the hills I mix it up 50:50 with sugar cane mulch. I'm sure the potatoes love the gentle feed provided by the compost, and the wonderful thing is that at the end of the potato harvest all the compost and mulch goes back into the compost bins to be turned into even more compost for the garden.

While outside this morning snapping away at the hills, a young magpie came down to the birdbath for a drink. And so instead of finishing off this blog with a trug full of compost, bountifully fertile though that might be, I thought I'd finish up with a magpie's delightful carolling song instead.


Thursday, October 16, 2008

Understanding onion weed

Pulled out the mother of all onion weed plants this morning, and thought it demonstrated perfectly why onion weed can never be defeated! But I have had some mild success against the stuff – no victories, mind you – just the kind of successes where I can grow other things without onion weed ruining everything. My garden still has onion weed, and always will.

Viewed close up, it's obvious why onion weed always bounces back after you've dug it out of the ground. With all those little bulblets just waiting to drop off, no matter how careful you are about digging out the main bulb you'll leave behind at least one bulblet, if not a dozen or more.

This time I dug out a big clump of soil, then washed it to collect as many bulblets as possible, but I'm not kidding myself that this method means no more onion weed.

As well as dropping bulblets when you pull it out of the ground, onion weed has a 'slow-release' way of sprouting its bulblets, too, that makes it a weed you just have to admire for its adaptation and 'survivor' skills.

Imagine you have lots of onion weed bulbs underground in a garden bed. At any given moment, only a fraction of the bulbs will sprout and shows grassy leaves above-ground. The rest stay put underground, doing nothing for the meantime. They'll wait till another time a few days, weeks or even months later, to sprout. So, even if you eradicate all the onion weed you can see, more will come up later from the 'sleeping' bulbs.

Herbicides such as Roundup can kill onion weed, but this stuff isn't remotely organic and it's also easy to spill a deadly drop of it on a treasured nearby plant while you're trying to apply it to the onion weed. And besides, the Roundup only kills the onion weed above ground. All the 'sleeping' bulbs underground will come up later on, anyway.

Black plastic covering the soil is nasty even if it's crudely effective. I think it's nasty because it 'cooks' every living thing under it, especially during summer. Healthy soils are meant to be full of air, to help plant roots breathe. Plastic smothers the soil and deprives it of air. It also heats the soil and can kill worms and lots of other beneficial micro-organisms, especially on a hot summer's day here in Sydney. And it's not porous, so it prevents moisture getting down into the soil, too, turning the soil bone dry. To my mind, covering soil with black plastic is bad all-round, and much worse than herbicide as a weed control.

I just use good old garden mulch (in my case sugar cane mulch), and pull out the onion weeds as I see them. Instead of using a two-pronged hand garden fork to pull out onion weed, wherever possible I just dig up a whole clump of soil around the weed, then fish out the weed and as many bulblets as possible, as per my photos at the top of this blog.

Sometimes this method isn't possible when weeds and wanted plants are all crowded in together. Sometimes I just break the onion weed leaves off at ground level, just to tidy up the look of the area.

In the end the main thing is to accept that you'll never get rid of onion weed completely. The best you can manage is to give it a hard time whenever the opportunity presents itself. But deep down, I don't hate this plant. I almost admire it sometimes, but not quite.


Wednesday, October 15, 2008

Bouncing baby beans

Sow some bean seeds and it's not hard to see where the story of Jack and the Beanstalk came from. From just barely breaking the soil at 7 in the morning, my bean shoots were two inches high by mid-afternoon.

Here's where the beans will be climbing. I've sown 'Blue Lake' climber beans around the base of this cute obelisk of willow.

7am Monday morning, and the first bean shoot breaks through the soil.

3pm Monday and it's off and racing skywards. I'm not all that keen for it to poke through the clouds and find sleeping giants. Just a nice crop of tender green beans in summer will do me fine.

The seed packet said to space them about 15cm apart, so that's what I've done.

Wednesday morning and they're all up. The little greeny-blue blobs on the ground are snail pellets. We got about 10mm of rain yesterday and I knew snails and slugs would head straight for these beans that night, so I spread around a few pellets. This morning I found five dead snails and three dead slugs all around the baby bean shoots. One bean shoot was munched to the ground but all the rest survived. The snail pellets are a new type based on iron, and the makers say they aren't poisonous to native lizards or birds, or to pets. At least they work just as well as the dodgy old super-poisonous pellets.

And so, for this bean-growing newbie, everything is off to a good start and growing quite nicely. The spectacular growth of the beans is great fun to witness. I'm becoming increasingly addicted to growing everything from seed. Not only is it much cheaper, but seed sprouting is more fun to see happening – it's just so much closer to nature. Besides, through the various seed catalogues you have access to a huge array of different vegie varieties, so it's just more interesting all-round. Sure, 'Blue Lake' beans are hardly a rarity, but everyone seems to say they have really outstanding flavour, and that's why I am growing all my own vegies and herbs – for the fresh, home-grown flavour.

Monday, October 13, 2008

Parsnips I have known

Some call it 'harvest', others call it 'day of reckoning', and when it came to my first attempt at growing parsnips, today worked out 50:50 on the harvest/day of reckoning gradient. With all 'above-ground' vegie crops you can check on progress, maybe even fix a problem if you find out about it early enough, so there isn't a lot of mystery when harvest time rolls around. But with 'below-ground' root vegies like parsnips, potatoes and carrots you don't know what you'll get until you yank the plant out of the ground. So today, with parsnips, I enjoyed three good results: some lovely looking successes, some amusing little duds, and a good lesson for the next time round.

This parsnip patch looked too leafy, handsome and happy to inspire confidence. All along I was thinking "all leaf, no parsnip – too much nitrogen". I didn't fertilise the soil prior to planting, and before the parsnips went in it was a sprawling patch of lamb's ears (Stachys), which I also never fertilised, so I couldn't figure out where all the nitrogen might be coming from.

Traaa daaa! Nervous Nellie need not worry. Some lovely parsnips came out of the ground.

And so did some not so lovely parsnips. The problem? Over-crowding. I didn't thin out the plants enough. All these stumpy guys were crowded together neighbours. All the longer, nicer ones didn't have anyone nearby. So that's my big lesson: don't crowd your parsnips, Bozo.

I did a sample harvest of just one parsnip last week, and cooked it that evening by my favourite method – roasting. It was beautifully tender and sweet, one of the nicest little parsnips I've ever eaten.

I've given some of my parsnips to a mate, Brent, who is a parsnip roaster from way back. His big tip – balsamic vinegar – and it is definitely a nice addition. Anyway, this is my share of the harvest, and that will make a couple of meals' worth of parsnips on the side. Aussies love their roast lamb, and roasted parsnips are the classic accompaniment to roast lamb (along with roasted potatoes, of course). So that's how I'll cook the first batch.

All in all a happy little harvest! Even the supposed 'failures' will still taste nice and sweet, and I've learned my lesson about over-crowding root vegies.
And finally, a couple of parsnip recipes to share.

Root vegie roast
While parsnips are yummy roasted with lamb, they're at their best when also roasted with other root vegies. Try roasting parsnip pieces with peeled and chopped potatoes, carrots, pumpkin, eschallots, garlic and thyme, along with anything else you have (eg, turnips, swedes). I put all the vegies into one big bowl, grind over some sea salt and black pepper, then drizzle over extra-virgin olive oil and toss all the vegies in this mix. (And you could add some balsamic vinegar at this stage, too – it is worth trying.) Roast them at 200°C for about 45 minutes, shaking the pan occasionally, or even turning them over with a broad spatula, to stop them sticking. For this cooking time to work, the trick is to cut the vegies into chunks which will all cook at roughly the same rate. Usually this translates into "don't make the potato chunks too big".

Parsnip chips
After peeling parsnips cut them into thin slices (2mm thick). I use a vegie peeler to do this. Then heat a 1cm deep puddle of olive oil in a small frypan until hot. Then throw in one single 'test' piece of parsnip, to make sure the oil is at the right temperature and the oil bubbles around the parsnip slice as soon as you drop one in. Once you're happy that the oil is hot enough, cook the chips in small batches, quickly, for about 2 minutes or until they start to brown. Scoop out with a slotted spoon, drain on paper towels. When they're done sprinkle with salt and serve either as an entree snack, or as a side dish.

Friday, October 10, 2008

Perpetual poppies

All good things come to an end, but it's lovely when they take their time about it and aren't in a hurry. Like this year's Iceland poppies. My first post about them was in early July, and that was by no means their first colourful day out in the sun. And here it is October 10 and they are still powering along and don't look like finishing any time soon. So a little homage to our seemingly perpetual poppy show is in order.

This is why we planted poppies – to supply us with cut flowers. My wife Pam loves poppies, and so I planted them for her, and this is a little corner of her studio, which overlooks our garden.

And this is what Pammy can see from her studio window. This is about as dense as the poppy flowering ever gets, but as we look out to the north-east from our back door, the morning sun streaming in back-lights the poppies every day, and I can't resist stopping and just standing there for a while to enjoy the sight. They're just so pretty and the delight of seeing them never seems to diminish a bit – that's Groundhog Day at its floral best.

This pic won't exactly get the sharp focus award, but it glows with colour and shows the crepe paper loveliness of the petals, too.

We cut flowers for poppies all the time, with our secateurs working silently alongside the humming teams of bees which tolerate us every bit as well as we tolerate them. Get on well, we do, all of us garden workers! I stopped and watched a bee for 10 or so minutes the other morning, trying to see if there was any kind of logical pattern to its flitting from one flower to the next. Absolutely none that I could see! Almost seems like the perfect randomness, chaos theory as applied to collecting pollen. Maybe that's it?

And then there are the short-lived (one day only) wild self-sown poppies which come up as a second generation on completely different looking plants. This one seemed to be winking at me one wet morning. Most of them are this sensual mauve/purple hue.

And so that's it for blogging about pretty poppies this year. What a wonderful treat they have been. Definitely growing them next year, and hopefully for many years more.

One piece of growing advice that a good gardener gave me early on was to keep "growing" the young poppy plants, by pinching out and discarding all the early little flower stems that popped up before the plants had reached full size. Though you lose a few early flowers doing this, getting the plants up to a good size before you let them flower seems to be the trick. The 'good size' is to have the plants almost touching when they are spaced about 25-30cm apart. After they get to this size, they then flower on for ages, and very strongly. I kept on fertilising the plants to get them up to size, but once I let them start flowering, I stopped all fertilising and left them to survive on natural rainfall, of which there has been a good but merely normal amount here in coastal, temperate Sydney.

Of course the other 'trick' is to bring cut flowers inside for vases all the time (which Pammy does very enthusiastically), and also to dead-head (ie, cut off) any flowers which have finished (my job). This regular cutting helps to keep the flower show going for much longer, too.

I suspect they'll still be flowering well enough to keep on picking blooms for vases well into November. Considering that they started blooming in June, that's almost perpetual motion.